
- Katharina Butsch
- May 4, 2025
- 4 min read


Food Explorer: Making (Herb) Butter with Kids
Kids aren’t exactly known for their healthy food choices. - Naturally, they eat what tastes good to them, while healthy choices often mean consciously saying no to something we enjoy. That’s why it’s important for kids to start learning early about what they eat, ideally in a fun way. The “Food Explorers” want to give you ideas how your kids can learn about food in everyday life. Just in time for the start of barbecue season, today’s topic is homemade (herb) butter.
What you need
500 mL Cream (The colder the cream, the longer you’ll need to shake it until the butter separates, so it’s best to let the cream warm up to room temperature.)
Ice water
Kitchen strainer
Small, empty glass bottles - e.g., salad dressing bottles (Depending on the kids’ age, an empty milk bottle works too. The key is to find a bottle with a wide enough neck, so the butter does come out easily afterward.)
Linen cloth (a tightly woven dish towel works too.)
2 bowls
Spatula or wooden spoon
Parchment paper
Fresh herbs, salt, pepper, lemon juice to taste
Yields between 150–200 g (about 5.3–7 oz) of butter, depending on how thoroughly you shake to separate the butter.
That's how it's done
Butter Making
Pour the cream into the bottle(s) (see picture a). To be able to shake properly, there needs to be enough air in the bottle. Also, the amount of cream per bottle should be adjusted to the kids’ strength and stamina - shaking (next step) gets tiring even with smaller amounts after a few minutes. So the chosen bottle(s) should be easy to handle and not too heavy.
Now shake the bottle(s) for about 15–20 minutes total. It’s a good idea to take turns shaking. Also, be sure to pause regularly and check if you notice any changes - this keeps it from getting too boring.
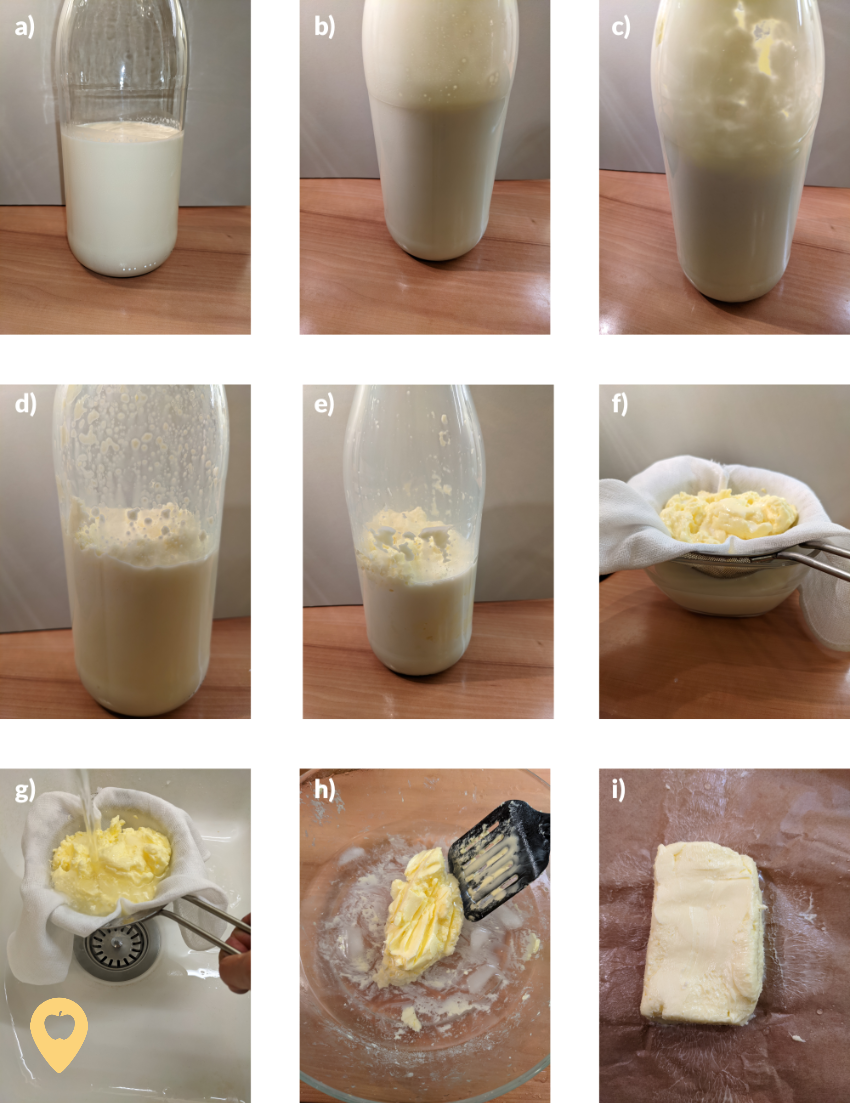
How soon you observe changes depends on the cream’s temperature and how vigorously you shake. That’s how it went for me: First, a firm white foam forms (see picture b), which fills the entire bottle after about 7 minutes. Shaking gets a bit harder at this point. I could see the first clumps forming after 8.5 minutes (see picture c), and after 12 minutes, the contents of the bottle became more liquid again and were easier to shake (see picture d). After 13.5 minutes, you could clearly see the separation of yellow butter clumps and white buttermilk (see picture e). I continued shaking until the end of the 20 minutes, but didn’t notice any further changes. When the white liquid no longer gets lighter or no more yellow flakes form, you can stop shaking.
Separation
Place a strainer over the bowl and line it with the linen cloth.
Once butter and water have separated, pour the contents of the bottle through the linen cloth (see picture f). The butter still has a loose, flaky texture at this point. However, it still might be a bit tricky to get the butter clumps through the bottle neck at first. If that happens, use the handle of a spoon or something similar to help.
Washing
Rinse the butter under running water (see picture g).
Prepare a bowl of ice water and place the butter in it. Then, using a spatula or wooden spoon, knead the butter. The water will become milky and cloudy as the remaining buttermilk is washed out. You may need to change the ice water 2–3 times (see picture h).
Shaping
While still in the ice water, form the butter into a uniform lump and remove it.
If you want to make herb butter, now is the time to add the fresh, finely chopped herbs and spices, as the butter is still soft and easy to mix.
Place the butter on the parchment paper, shape it with the help of the paper, and let it harden in the fridge (see picture i).
What we can learn
Starting a conversation with kids on the topic is extremely easy: after I announced what we were going to do, I, for example, was helpfully asked if I knew that butter could easily be bought at the store... and just like that, we were right in the middle of it.
There are three types of butter – sour cream butter (here lactic acid bacteria are used to speed up the process), sweet cream butter, and mildly cultured butter. We’re making sweet cream butter.
Butter can not just be made from cream, but also from milk. However, the fat content in milk is so low that our process of making butter through shaking isn’t practical.
When you buy “German butter” in the store, it typically has a fat content of >82% and a water content of <16%. With homemade butter, even after careful washing, a small amount of buttermilk remains in the butter. The more buttermilk there is, the shorter the butter’s shelf life.
The buttermilk collected in the first bowl can be drunk. But be careful: from my experience, shaking doesn’t fully separate the fat. Therefore, the fat content of this homemade buttermilk is likely to be much higher than that of store-bought buttermilk.
And if you get asked questions you can’t answer, it’s the perfect opportunity to look it up together with your kids and show them how to find out what you don’t already know... Have fun exploring the food!
